Setting up VS Code
Visual Studio Code or simply VS Code is an Integrated Development Environment (IDE) built by Microsoft. It is a very popular free and opensource IDE among software developers.
After reading this article, you will be able to
-
Download and install VS Code
-
Get it ready for Python development
-
Change VS Code themes
-
Change settings (both User and Workspace) according to your needs, and
-
Add a vertical ruler to the editor.
The installation instructions are applicable only to Unix based systems (i.e. Linux and Mac OS).
Get VS Code on your machine
-
Download VS Code: Go to VS Code Downloads Page and download the installation file.
-
Install VS Code: Open a terminal and navigate to the directory in which the installation file is saved. Then, run the following commands.
sudo dpkg -i <filename>
sudo apt install -f
VS Code you have now is nothing more than a very well designed text editor. While this is certainly a good feature, you can make it better by customising it according to you needs. Since you want to code in Python, let’s first install the Python extension for VS Code.
Get VS Code ready for Python
In this step, we install a Python extension and select a Python interpretor to compile the code.
Install the Python extension
Open VS Code and hit Ctrl + Shift + X. This opens the VS Code Extension
Market Place.
Type Python in the search field. You will get many results, but click on the one with Microsoft’s name. Click Install in the new window that opens.
Select the Python interpretor
We generally have more than one version of Python interpreter installed. Therefore, we need to tell VS Code which version to use to process the code. This is how we do it.
-
Open the Command Palette: Press
Ctrl + Shift + P. A search window pops at the top of your window. This simple window, called the Command Palette, helps you navigate the VS Code menu efficiently. -
Choose the interpretor: Type Python:Select Interpreter in the Command Palette window. Choose the interpreter of your choice from the list.
Change how VS Code looks
With the basic set up ready, we can now change the default settings according to our taste. Let’s start with the overall theme first.
-
Open Command Palette: Press
Ctrl + Shift + P. Type Theme in the Command Palette Window that pops up. -
Select theme: Select Preferences: Color Theme from the list and use up and down arrow keys to test different themes. Choose your favourite by hitting Enter.
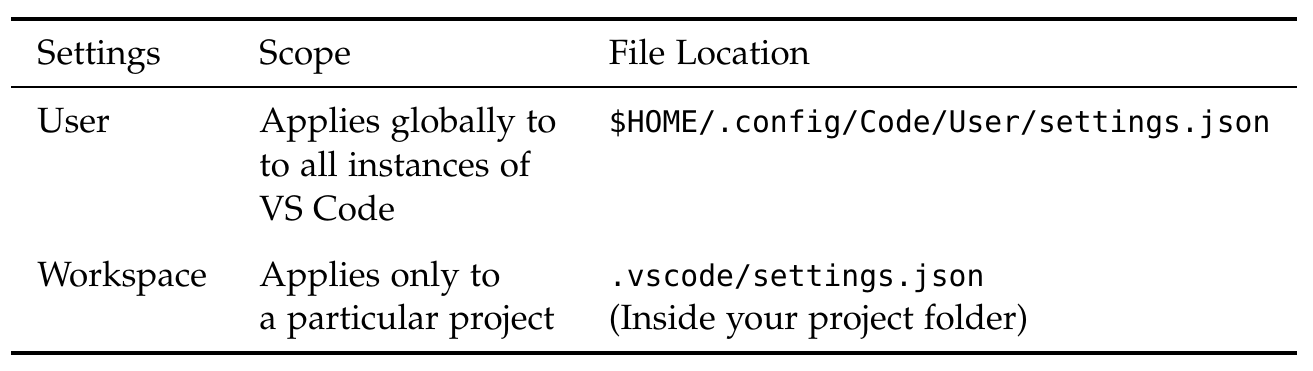
Change User and Workspace Settings
VS Code can be configured at two different levels: User and Workspace. User Settings affect behaviour of VS Code globally. Workspace Settings are applicable only to a particular project. However, Workspace Settings override User Settings.
Let’s look at a simple example to understand this better. Suppose you are comfortable with a font size of 20. To make this your default font size, you go to User Settings and set font size to 20. Now, suppose that, you are working on a project that will be reviewed regularly by someone who prefers a bigger font, say 24. Instead of increasing the font size every time your reviewer comes, you can set 24 as the default font size for that particular project. You do this by changing the font size in Workspace Settings. Since, Workspace Settings override the User Settings, your project file be displayed with a font size of 24 even though the default font size is 20.
Now let’s see how we can change User and Workspace Settings.
-
Create Workspace: Workspace can be considered as your project folder, though it can be much more that. Therefore, you can create a Workspace by simply opening the project folder from the File menu. Workspace Settings come into picture only after a workspace is created.
-
Open Settings: Open the Command Palette by hitting
Ctrl + Shift + P, and type Settings. Select Preferences: Open Settings from the list that appears. This opens Settings page in a separate tab. -
Change whatever you want: At the top of the page, there is an option to choose between User and Workspace. Click on the appropriate button, and make all the changes you want. The changes are automatically saved.
Both User and Workspace Settings are saved in two different files. Both the
files have the same name settings.json but are created at different
locations. Table below summarises the two types of settings.
Adding vertical rulers
It’s a good practice to have not more than 80 characters in a line of code. But, how do we know whether we are well within this limit? One can look at the column number, but that’s not practical. Instead, we can add a vertical ruler at the 80th column. This is how you add it:
-
Open Settings: Open the Command Palette by hitting
Ctrl + Shift + P, and type User Settings. In the search bar, type Editor: Rulers and click on Edit in settings.json. This opens a file in the editor. -
Edit
settings.jsonfile: Add"editor.rulers": [80, 100]to the file, and save. You will see two rulers at columns 80 and 100.
That’s it! Now you have your VS Code up and running, and you also know how to change things if need be.